| |
Performing a Safe Laparoscopy - I |
The proper hardware and instruments are essential for performing a safe laparoscopy.
Most large medical centers have one or several dedicated interventional laparoscopic
operating rooms. Although not essential, it centralizes the hardware used for these
procedures. This enables the nursing staff to become more familiar with the hardware and
instruments used.
1. POWERED OPERATING ROOM TABLE
Using an electric or powered operating room table is a definite asset. In most cases,
the surgeon has to frequently change the position of the patient in order to enhance
exposure and visualization.
2. LAPAROSCOPIC SYSTEM
These components include a high resolution monitor, a camera and video signal enhancer,
a light source and a cord. Optional equipment includes a printer and/or a video cassette
recorder.
- High Resolution Monitor: A Main and a Slave Monitor are used for most
procedures. The usual size is 19 inches.
- Camera and Video Signal Enhancer:
This is the system we have used the most. Although we are still using earlier
generations of their video camera, their latest generation of Video
Camera (Three Chips and higher) has proven to be one of the best systems available. We
are now also using a STRYKER Model 882TE system which appears to be a very competitive
model.
Light Sources and Light Cord:
A 300-watt xenon light source is usually used. The light was transmitted via
flexible, fiberoptic bundles connecting the light source to the telescope. The operator
and the nursing staff should always be aware the light cords have a limited life span.
When a significant decrease in light delivery is noted, the surgeon should verify the
majority of the fiber optics are functional.
- High Flow Electronic Insufflator: The CO2
pump should be a High Flow insufflation pump with a low flow and a high setting. This
insufflator should be capable of delivering a maximum gas flow of CO2 of 9.9 L/min. These
insufflators are electronically equipped to monitor, maintain and control a constant
intraabdominal pressure between 12 and 18 mm Hg. The inflow tubing is connected to the
insufflation port of the machine and to a V connector that is attached to two different
trocar insufflation ports for better and faster insufflation. A CO2 gas filter should be
used between the pump and the trocar. Before every laparoscopy, the tubing system should
be flushed with CO2 for at least one minute.
Creation of the Pneumoperitoneum
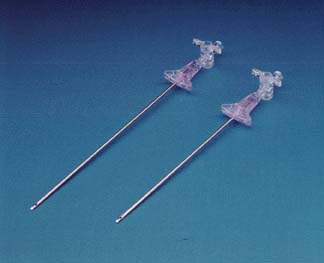 |
We always create the pneumoperitoneum using a disposable Veress Needle or an Auto Suture SURGINEEDLE*. We have
totally disregarded reusable Veress Needles. Potential catastrophes have occurred on our
surgical service when the spring of the resusable Veress needle malfunctioned transforming
the Veress needle into an uncontrolled harpooning device. In addition, we continue to
question the sterility of these reusable needles.Veress needles come in two lengths (120
cm and 150 cm); the longer version is obviously for obese patients. We are however always
able to create a pneumoperitoneum with a short Veress needle in these patients. The
hospital no longer stocks the longer version, as we rarely use it. |
The Technique
1. Preparation of the Abdomen: The entire, anterior
abdominal wall should be prepped from mid thigh to the nipple line and as lateral as
possible. Laparoscopic procedures can occasionally become very difficult and may require
the insertion of additional trocars away from the original operating site.
2. Grounding the Patient: All patients, without
exception, should be properly grounded.
3. Insertion of the Veress Needle: The safest access
into the intraabdominal cavity with a Veress needle is the subumbilical area. The anterior
abdominal wall is the thinnest at this level and all fascial layers are fused into single
fascial planes. Thus, the operator should always attempt to insert the Veress needle at
this site in the virgin abdomen.
- STEP 1: Elevating the Anterior Abdominal
wall: The anterior abdominal wall needs to be elevated in order to distance it
from the intraabdominal contents. This is done by grabbing the abdominal wall directly
under the umbilicus with one hand. If the patient is overweight, two towel clamps can be
used on each side of the umbilicus to achieve the same result.
- STEP 2: The Incision: A 1 mm
incision is made with a # 11 Scalpel below the umbilicus.
- STEP 3: Checking the Instruments and
Inserting the Veress Needle: The spring function or the retraction capability of
the Veress Needle is checked. The operating table should be in neutral or flat position.
The needle is then slowly inserted into the incision. It is angled toward the pelvis and
advanced. The operator should feel or sense the needle passing through two distinct
planes.
The needle is advanced and withdrawn several times. If this is done
easily and without obstruction, the tip is in proper position.
- STEP 4: The Saline Test: Although we no longer
perform this test routinely, all neophytes laparoscopic surgeon should do so. Ten cc of
normal saline is injected. This should be done easily. The abdominal pull is then
released. The Veress needle is then filled to the rim with normal saline (or a open
syringe can be used). The tension on the skin is resumed and the level of saline should
immediately drop if the needle is in proper intraabdominal position.
- STEP 5: Initiating the Insufflation: The
Veress needle is then connected to the CO2 insufflation tubing (a filter should be used).
Insufflation is initiated at a low flow. Intraabdominal pressure recorded at this point
should not exceed 8 mm Hg. Entry pressure at low flow should be checked immediately while
the abdominal wall is still elevated. If higher, move the needle around or resume the pull
on the skin or anterior abdominal wall. If the pressure is too high, the Veress
needle it
is not in the right position and needs to be removed. Begin again.
If in place, switch to high flow and inflate the intraabdominal cavity.
- With a Blunt Trocar or BLUNTPORT* Trocar (Hasson Type Cannula)
for the Scarred Abdomen
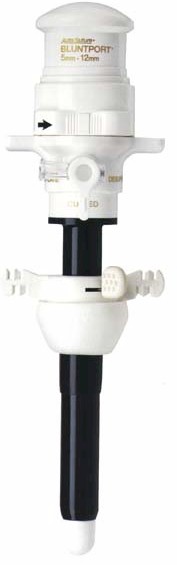 |
The blunt trocar is used to safely create a
Pneumoperitoneum in the scarred abdomen. It is inserted by making an initial skin and a
fascial incision. The fascial incision should be 1 to 1.5 cm in size. A long suture (2.0)
is placed on each fascial edges. With finger dissection a tunnel or an opening into the
intraabdominal cavity is gently created. The BluntPort* is then inserted. The foamgrip
anchoring device is set and secured with the previously placed suture. The insufflation
port is connected to the insufflation tubing and the pneumoperitoneum created. |
- With a VISIPORT* OPTICAL TROCAR for the Scarred Abdomen
 |
Insuflate the abdomen prior to the insertion of the
VISIPORT* OPTICAL TROCAR. A 1 cm skin incision is made with a plain scalpel. A telescope
is inserted into the VISIPORT OPTICAL TROCAR* and the path of entry of the VISIPORT
OPTICAL TROCAR* into intraabdominal cavity is visualized. The VISISPORT OPTICAL TROCAR* is
advanced slowly through the different planes of the abdominal wall. These planes are cut
slowly with the blade of the VISIPORT OPTICAL TROCAR* (at the tip of the instrument) until
the intraabdominal cavity is reached. Pneumoperitoneum must be created or abdominal wall
elevation must be performed prior to the insertion of the VISIPORT* OPTICAL TROCAR.. |
Maintaining the Pneumoperitoneum
A laparoscopy can be performed without significant, deleterious effect
with intraabdominal pressures up to 20 mm Hg. However, some laparoscopic inguinal hernia
repairs require higher pressures in the 18 and 20 mm Hg. range to achieve necessary
additional exposure.
Our guidelines are clear.
- The best operating intraabdominal pressures are between 10 to 15
mm Hg. The visualization of this type of intraabdominal pressure can be further
enhanced by modifying the patients’ position (operating table position to
Trendelenburg to reverse, etc.)
- Higher pressures in the 15 to 20 mm Hg range are suboptimal.
There is a definite correlation with increased postoperative patient discomfort and
recovery and the use of increased intraabdominal pressure.
- Pressures beyond 20 mm Hg are classified as dangerous with
potential hemodynamic and pulmonary compromise and long term effects on the intraabdominal
wall musculature. When such pressures are used, some patients will actually
report increased abdominal girth and a bloating post-operative feeling which persisted for
months after the procedure in spite of intensive exercise.
 |
To Go
to Next Section |